Camouflage and Cunning
The conservation and restoration of historic ships is a costly undertaking. Money is always scarce and this leads inevitably to money-saving methods being introduced which camouflage the real conditions underneath. Such was the case when the Oak beam at the forward end of the main deck in the crew's quarters was examined. This beam, historically, was of great importance since into it was carved the ship's Official Number and Net Registered Tonnage. The official registration of ships came into being many years before Discovery was built but it was probably the Merchant Shipping Act of 1854 in the United Kingdom that formed the basis of ship registration as we know it today. By looking up the Official Number in the Register one can find the detail of the ship; its name; where it was built; who built it; who owned it, etc., etc. The Net Registered Tonnage was a measurement, not a weight. That may seem confusing but it was arrived at after calculating how many cubic feet made up the spaces available for the carriage of passengers and cargo. In other words the earning spaces as it referred to a merchant ship. The total space in cubic feet was then divided by 40 and the result was the measured net tonnage of the ship (40 cu. ft. = 1 ton). This information was used for all sorts of purposes, port charges are a typical example.
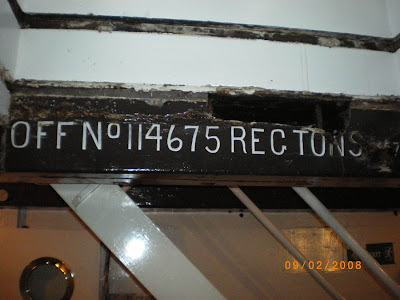
The beam was therefore of great historical significance and the pictures below show the condition it was found to be in during our examination.
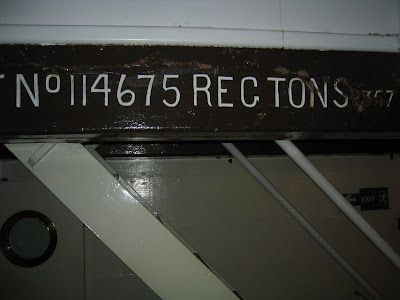 |
| Surface of beam belies what is underneath |
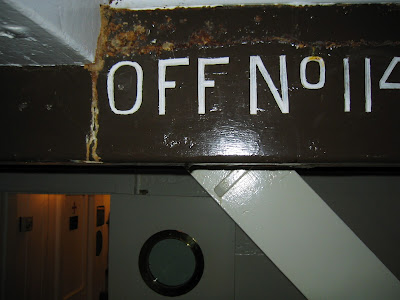 |
| Hints of trouble |
 |
| It gets worse! |
 |
| Digging out |
 |
| Total decay |
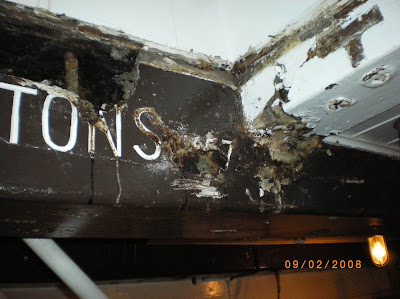 |
| Not a pretty sight! |
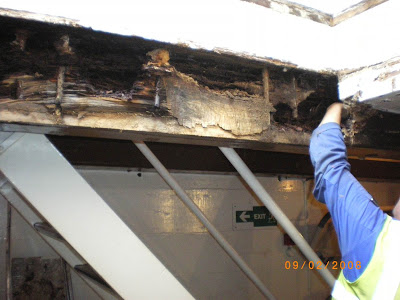 |
| Truth revealed. |
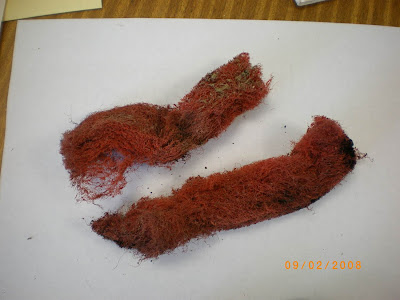 |
| Fibreglass packing from inside of beam. |
At some time in the past fresh water had been allowed to slowly penetrate the timber and, gradually, it decayed to the state we found it to be in. But wait! Evidence collected showed that someone had found the problem before we did. That someone may well have wanted to cure the ill but could not afford to do so. That well-meaning person decided to rout out what decay he could, pack the voids with fibreglass with a filling compound then pass it off as original. Cunning eh!
What at first seemed to be a straightforward restoration job became a major one. To remove the whole beam that contained some sound timber would have amounted to vandalism. So the beam was cropped (cut) until rot was no longer obvious, then, we cut it about three feet into the sound wood where the decay spores had not yet travelled and scarfed (set in) a new, accurately fashioned, replacement piece of Opepe (a hardwood from West Africa, more durable and cheaper than Oak). The finished article proved to be very satisfactory.
 |
Fully restored - a good job done!
|
While I'm on the subject of Opepe timber it gives me the opportunity to introduce another subject that dominates the restoration of historic wooden ships and that is timber conservation in its wider sense. Always the ideal in restoration is replace like with like; however, if what needs to be restored or replaced is timber that is known to be scarce with future supplies considered as unsustainable, then we must do what we can to protect that species. This is where advice from known experts such as TRADA in the United Kingdom come in handy in recommending alternatives. Opepe is considered an alternative to Teak and other hard woods since supplies are generally farmed and sustainable. It is now widely used in wooden ship restoration but is not a low-cost alternative. The price is lower than that of Teak but not dramatically so; although it does satisfy our continuing need to protect the other timbers considered to be at risk.
One of our ultimate goals was to ensure the upper decks were watertight.There are many modern sealants on the market that may well be tried and tested but our task was to keep as close to the original methods as possible. The age old method of routing out all of the Marine Glue (a mixture of Bitumen and Tar), the Oakum caulking and the layer of Cotton that formed the watertight barrier between the seams of the deck planks was started. Caulking is a Shipwright's skill and in the United Kingdom, a dying one. I was fortunate that our main contractor was one of the few who had retained the skills and it was interesting to watch them at work. The tools they used were mainly original; a caulking mallet; caulking chisels; cotton twine; oakum; original Marine Glue that came in cans that had to be sliced open to release the solid material within; sharp hammers to break up the solid glue; a glue ladle and heat in the form of a bottled gas burner. First a strand of dry cotton twine was hammered into the bottom of the cleaned seam; a layer of oakum (twisted tarred Hemp) followed to be compressed down into the seam. Then came the tricky bit! A canister was partly filled with fragments of the solid marine glue, placed over the gas burner until the solid became liquid. This hot liquid was poured into the ladle to be carefully run into the seam until the level was just below the surface of the plank. In the act of pouring, the liquid becomes slightly aerated, as it cools in the seam small bubbles of air rise to the top to leave a solid mass beneath. Now is the time to pour a thin final coat of the glue, let it harden then scrape off the surplus that protrudes above the level of the plank. Hey presto! The seam is watertight and will remain that way for some time if the deck is provided with proper interim care. This involves regular washing with salt water, sometimes with a very fine sand mix that can find its way into cracks in any seam that may have deteriorated slightly, thereby providing a further barrier to the ingress of fresh water. If it is known that the salt water used may contain some nitrates from the runoff from agriculture lands or elsewhere, it is advisable to include a diluted fungicide in the salt water. This prevents green algae growth on the deck where there is little or no traffic.
 |
| Shipwright caulking. |
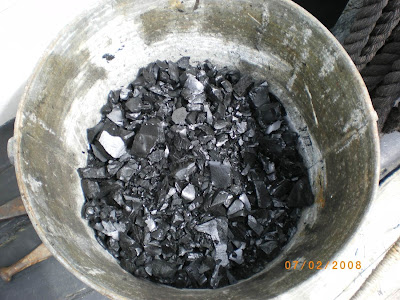 |
| Solid sealant fragments before heating. |
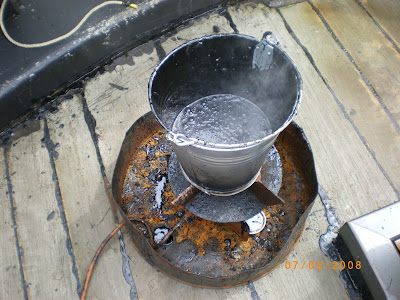 |
| Heated ready for use. |
 |
| Ladle ready to fill. |
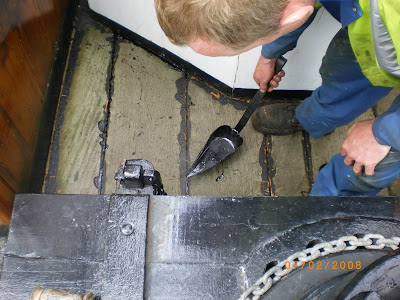 |
| The art of pouring. |
 |
| Finishing. |
 |
| And finished. |
The bad news is that the marine glue sealant will not last forever. It has an enemy that we ordinary mortals look upon as a friend. The sun! That glowing orb in the sky that rises in the East and sets in the West every day of our lives. That shining globe provides warmth and comfort, pleasure and sunburn, ripens crops to provide our everyday nutritional needs, but it has a sting in its tail in so far as our deck sealant is concerned. That sting comes in the form of rays.
Ultra-violet rays that will, in time, break down the chemical compounds of marine glue causing it to crack and eventually reducing it to a powder. This may take five to ten years but will happen no matter what precautions are taken. Take none and you get a five year life; take some and you may extend the life of the sealant to ten years at most. The bottom line is that in order to keep the decks watertight, a section of the deck plank seals should be routed out and resealed during the fourth year after the whole deck had been sealed. Further sections should be renewed annually during subsequent years until a rolling deck maintenance plan has been established. Only by doing this will fresh water be unable to leak into the inner hull, with the added bonus that annual maintenance costs can be kept to a minimum.
That's enough for this part; next we tackle the restoration of the main support beam in the forecastle at the bow of the ship.


No comments:
Post a Comment